
 This post is for my friend Al, who asked me months ago for my pecan pie recipe and has waited ever so patiently even though it’s now less than a week before Thanksgiving. Not only have you earned the pie recipe; you’ve also earned the pie crust recipe and secret. In the spirit of the upcoming holiday, this also is for all my friends who think pie crust is hard to make and are amazed that I make mine from scratch.
First, the most important message: It’s not hard! Truly, I love to bake and love to cook, and there are many things that I can do well in the kitchen. But I’m no master baker. I have my share of disasters, and quite frankly egg whites just defeat me. Specifically, the folding of egg whites. If a recipe calls for folding in egg whites, I either move right on to another recipe… or I back a disaster. Truth.
The Pie Crust Secret
Pie crust, on the other hand, is not hard. There’s just a secret that most people don’t know. As my mother used to say, don’t touch it with your hands any more than you have to. According to mom, the grease from your hands gets into the crust and makes it tough. I don;t know if that’s true, but something definitely turns it tough if you handle it. So my solution is to never touch it at all. That’s right, not at all. Not even when I’m rolling it out. Not even when I’m transferring the dough from the mixing bowl to the flowered surface for rolling out.
How is this possible? Through the magic of plastic. Before I touch the pie dough, I put plastic baggies over my hands; only the plastic touches the dough. (I’d show you a picture, but it’s kind of hard to operate a camera with plastic baggies on your hands. I also roll the dough between two sheets of wax paper; again, only the paper touches the dough.
[tweetthis]Pecan pie and the secret to #pie crust![/tweetthis]One other word of wisdom as you prepare to make pie crust. Do not – repeat, do not – use a mixer for this, either an electric one or a hand one. Use a pastry cutter. If you don’t have one, it’s well worth the investment, as they’re cheap, easy to find, and easy to use. Mine was my mother’s (and, again, possibly my grandmother’s as well). Nothing fnacy, but beautiful to me both as a family heirloom and because I love antiques.
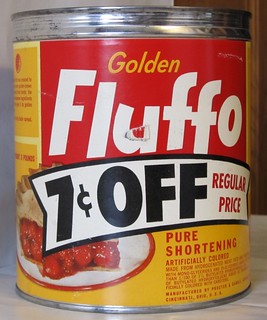 So let’s get to the pie dough recipe. Remember, there’s nothing special about this recipe. It was my mother’s and probably my grandmother’s before that. I know there are people who swear that pie crust needs to have butter, but I disagree – respectfully, of course. And I know that lard has it’s fans, but I’m not one; I don’t like the flavor. My mother actually swore that Fluffo was the best shortening for pie crusts, but I haven’t seen Fluffo in a store for years so I have switched to Crisco. (Based on this page on the Smuckers website, it looks like Smuckers owns both brands; and although the mere existence of this page suggests that Fluffo must be available somewhere, I can find no evidence of that either in stores or on the Internet.)
Pie Crust
(makes 2 crusts)
2 Cups flour
1 tsp. salt
2/3 Cup + 2 Tbsp. shortening
4 Tbsp. water
1. Mix the flour and salt together in a mixing bowl, using a fork or spoon.
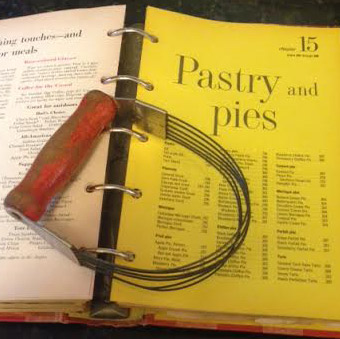
My vintage pie cutter is probably older than the 1965 cookbook beneath it.
2. Add the shortening, and cut together until partially mixed. Do not use a mixer for this; use a pastry cutter.
3. Once your shortening is no longer all in a giant lump, sprinkle in the water so that it is distributed evenly around the bowl.
4. Continue cutting together the dough until you have a rather course crumble. Don’t cut it too fine and powdery; you should still see some small clumps of shortening. Little bits of shortening distributed throughout help give the finished crust the flaky texture you want.
5. Slip plastic baggies over both of your hands, and divide the dough in half. Pat/press one half into a loose ball. and cover with plastic wrap while you roll out the other half.
6. To roll out the crusts, place a sheet of wax paper over your counter surface. Pat the dough into a flat round, and sprinkle flour in the center of the wax paper (in an area as large as your flattened dough). Place the dough on the flour, and sprinkle more flour on top, allowing the flour also to coat the wax paper around the dough. Place another sheet of wax paper on top.
7. Use a rolling pin to roll out the dough in between the sheets of wax paper, taking care not to crease the paper. You may need to lift the top sheet of wax paper and set it back down atop the dough to keep it from creasing.
8. When the rolling becomes a bit harder, you’ve pushed it to the edge of the floured surface of the wax paper, and it’s time to loosen the paper and turn the dough over. Gently peel the top sheet of wax paper off the dough; sprinkle more flour on top of the dough, and replace the sheet of wax paper. Then put one hand underneath the lower sheet of wax paper and the other on top, lift up the dough and flip it over. (This is a bit messy; you’re going to get flour on your countertop; get over it.) Peel off the sheet of wax paper that’s now on top, sprinkle flour on the dough and on the wax paper around it, replace the wax paper, and continue rolling. Repeat this process until your crust is thin/wide enough for your pie plate.
9. To transfer the dough to the pie plate, peel off the top sheet of wax paper, replace it on top of the dough as if you were going to roll some more, but don’t add any more flour. Flip the dough over, and remove the other sheet of wax paper. Take your pie plate in one hand, place the other underneath the pie crust, and lift up the crust along with the sheet of wax paper below it. Place your pie plate upside down on top of the pie crust, turn over, set it down, and remove the wax paper from it. Settle the crust smoothly into the pie plate.
10. When it’s time to finish the edges of the crust (either now or after it’s filled and second crust placed atop filling), crimp the crust along the edges gently using your hands. (This is the only time when I allow my hands to touch any part of the crust.)
OK, now that I’ve written it down, it looks like a lot of steps, but it’s honestly simple.
And now, you’re ready to make the pie.
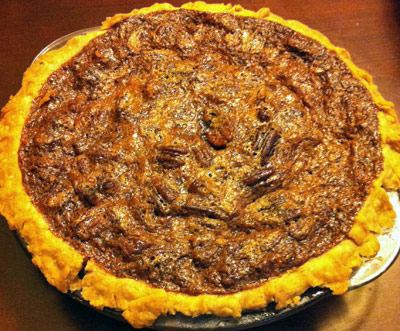
Mom’s Pecan Pie
3 eggs
2/3 Cup sugar
1/2 tsp. salt
1/3 Cup butter
1 Cup dark corn syrup
1 Cup pecan halves
1. Beat together all ingredients except pecans.
2. Stir in pecan halves.
3. Pour into pie shell.
4. Bake at 375 degrees, 40-50 minutes.
Happy Thanksgiving, Al!